
Stamping Die Price Decoded: From First Quote To True Cost
Understanding Stamping Die Pricing From the Ground Up
Imagine getting two quotes for what looks like the same stamping tool and seeing a tenfold difference in price. One supplier says $15,000, another says $150,000. Neither is wrong. They are likely interpreting your requirements differently, building to different standards, or quoting entirely different die types for the same part geometry. That spread is not a sign of market chaos. It reflects the sheer number of variables that determine stamping die price, and it catches buyers off guard when they have not mapped those variables before reaching out for quotes.
What Is a Stamping Die and Why Does Price Vary So Much
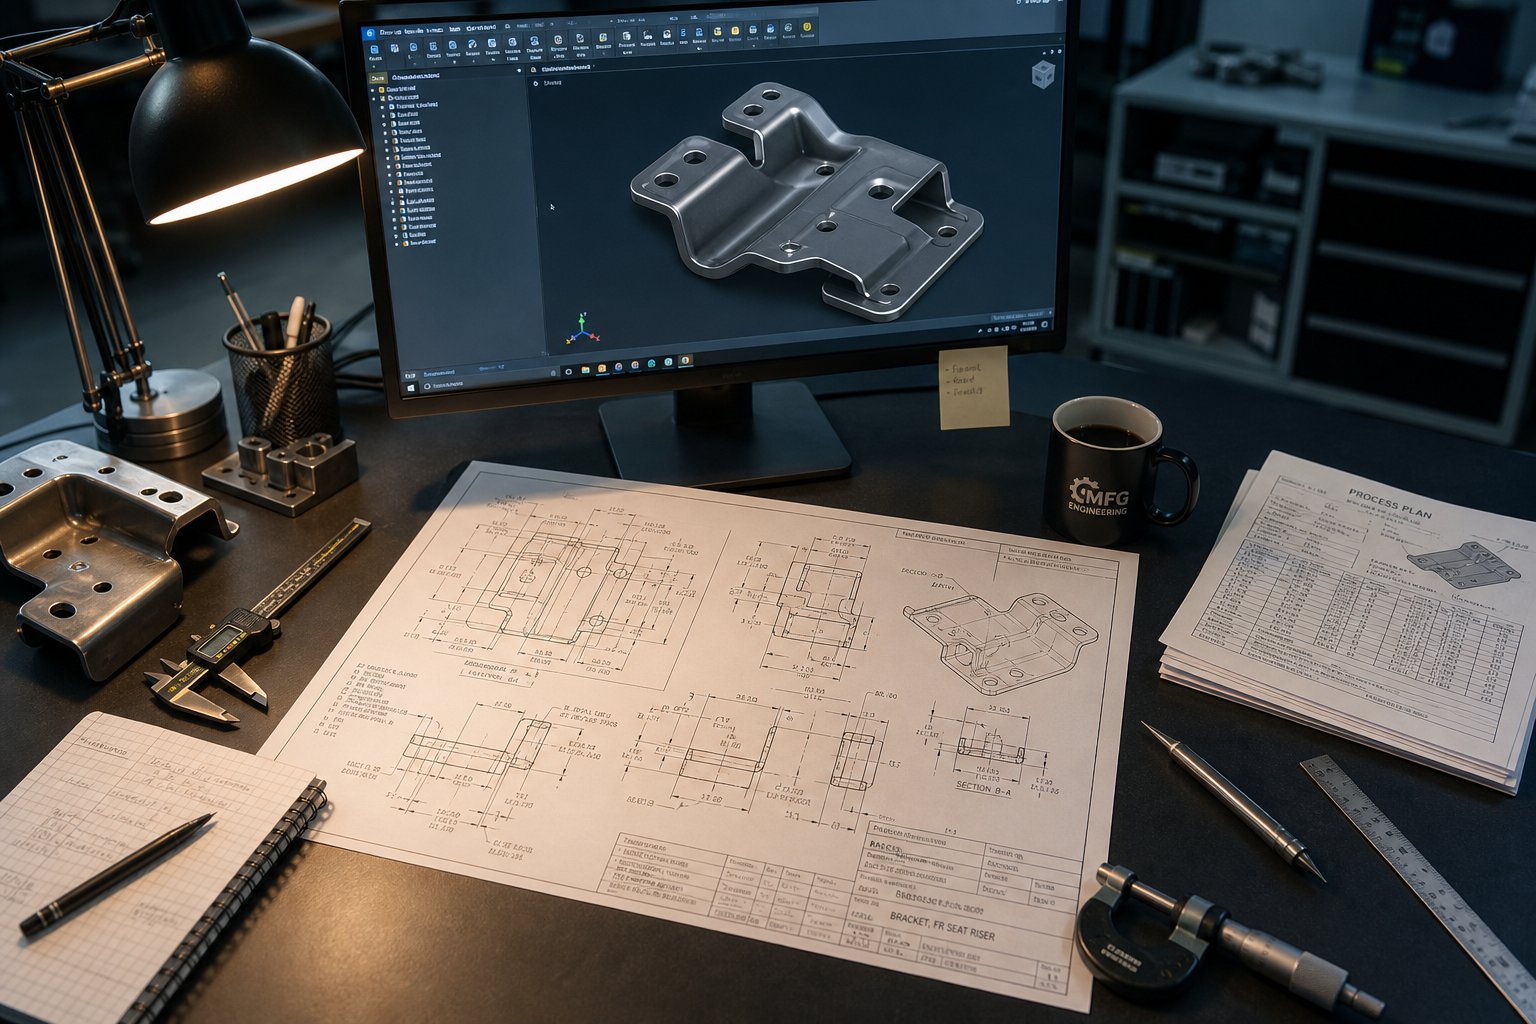
A stamping die is a precision tool mounted in a press that transforms flat sheet metal into finished or near-finished parts through cutting, bending, drawing, and forming operations. Every metal stamping die is custom-engineered to produce a specific part, which means pricing is never off-the-shelf. The final cost is shaped by five interconnected factors: die type and station count, part complexity and tolerances, tool steel grade, expected production volume, and the geographic location of the toolmaker.
A simple single-station die stamp used for blanking flat brackets might require only basic engineering and standard steel. A multi-station progressive die producing automotive connectors with tight tolerances and coining operations demands weeks of design work, premium materials, and extensive tryout time. Each additional station in a progressive die can increase tooling cost by 8 to 12 percent, and complexity does not scale linearly. That is why metal stamping dies span such a wide cost range, from a few thousand dollars to well over a million for large-panel transfer tooling used in automotive body production.
Stamping die prices can range from $3,000 for a simple blanking die to over $1,000,000 for a complex automotive transfer die line. Understanding the cost drivers behind that spread is what separates realistic budgeting from guesswork.
It is worth noting that the term "die stamp" appears in two different contexts. Industrial metal stamping dies, the focus of this article, are production tooling designed to form metal parts at scale. Debossing dies and metal debossing tools, on the other hand, are used for decorative marking, creating impressed designs on leather, paper, or soft metals. While both share the keyword space, this guide is built entirely around production tooling for sheet metal parts, covering the cost factors, pricing structures, and procurement strategies that matter to manufacturing engineers and sourcing professionals.
Who This Pricing Guide Is For
Whether you are a procurement manager comparing offshore and domestic quotes, a product engineer trying to budget tooling for a new program, or a startup founder encountering metal stamping for the first time, you will find this guide useful. The goal is straightforward: give you a clear framework for understanding what drives cost so you can ask better questions, set realistic expectations, and evaluate supplier quotes on equal terms.
In the sections ahead, you will find detailed breakdowns by die type, tool steel selection, workpiece material influence, production volume economics, regional pricing differences, total cost of ownership, and practical strategies for reducing your tooling spend without sacrificing quality. Each section addresses a gap commonly left open in generic pricing guides, where ranges are listed but the reasoning behind them is absent. The difference between a $25,000 quote and a $75,000 quote for the same part often comes down to specification clarity and engineering choices, not supplier greed. This guide helps you see exactly where those cost levers sit.
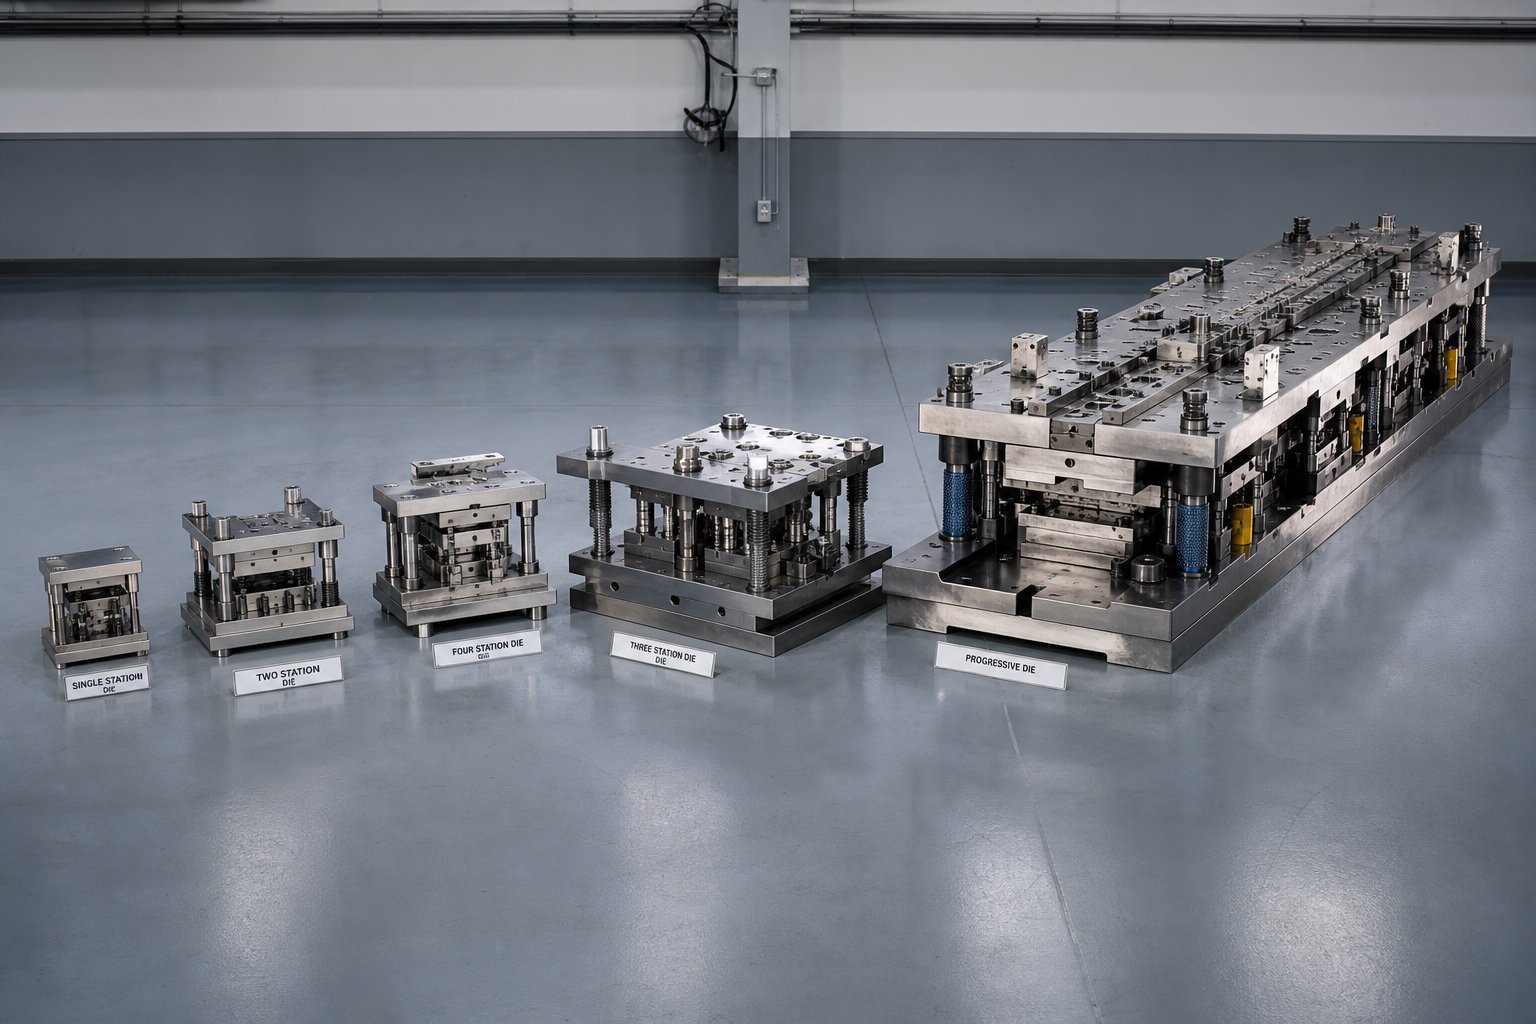
Price Ranges by Stamping Die Type
The single biggest line item on any stamping die quote is the type of die being built. A standard die for blanking flat washers and a 20-station progressive die for automotive connectors live in completely different cost universes, even when the finished parts are roughly the same size. Knowing where each die type falls on the pricing spectrum helps you evaluate whether a quote is reasonable before you dig into the finer details.
| Die Type | Typical Complexity | General Price Range | Primary Use Cases |
|---|---|---|---|
| Single-Station (Blanking/Piercing) | Low | $3,000 - $15,000 | Flat brackets, washers, simple clips |
| Compound Die | Low to Medium | $8,000 - $25,000 | Flat parts needing multiple cuts in one stroke |
| Progressive Die | Medium to High | $15,000 - $60,000+ | High-volume connectors, brackets, structural parts |
| Transfer Die | High | $100,000 - $1,000,000+ | Large body panels, deep-drawn housings, complex 3D parts |
| Hot Stamping Die | High | $80,000 - $300,000+ | Ultra-high-strength steel automotive safety components |
Progressive Die Pricing Factors
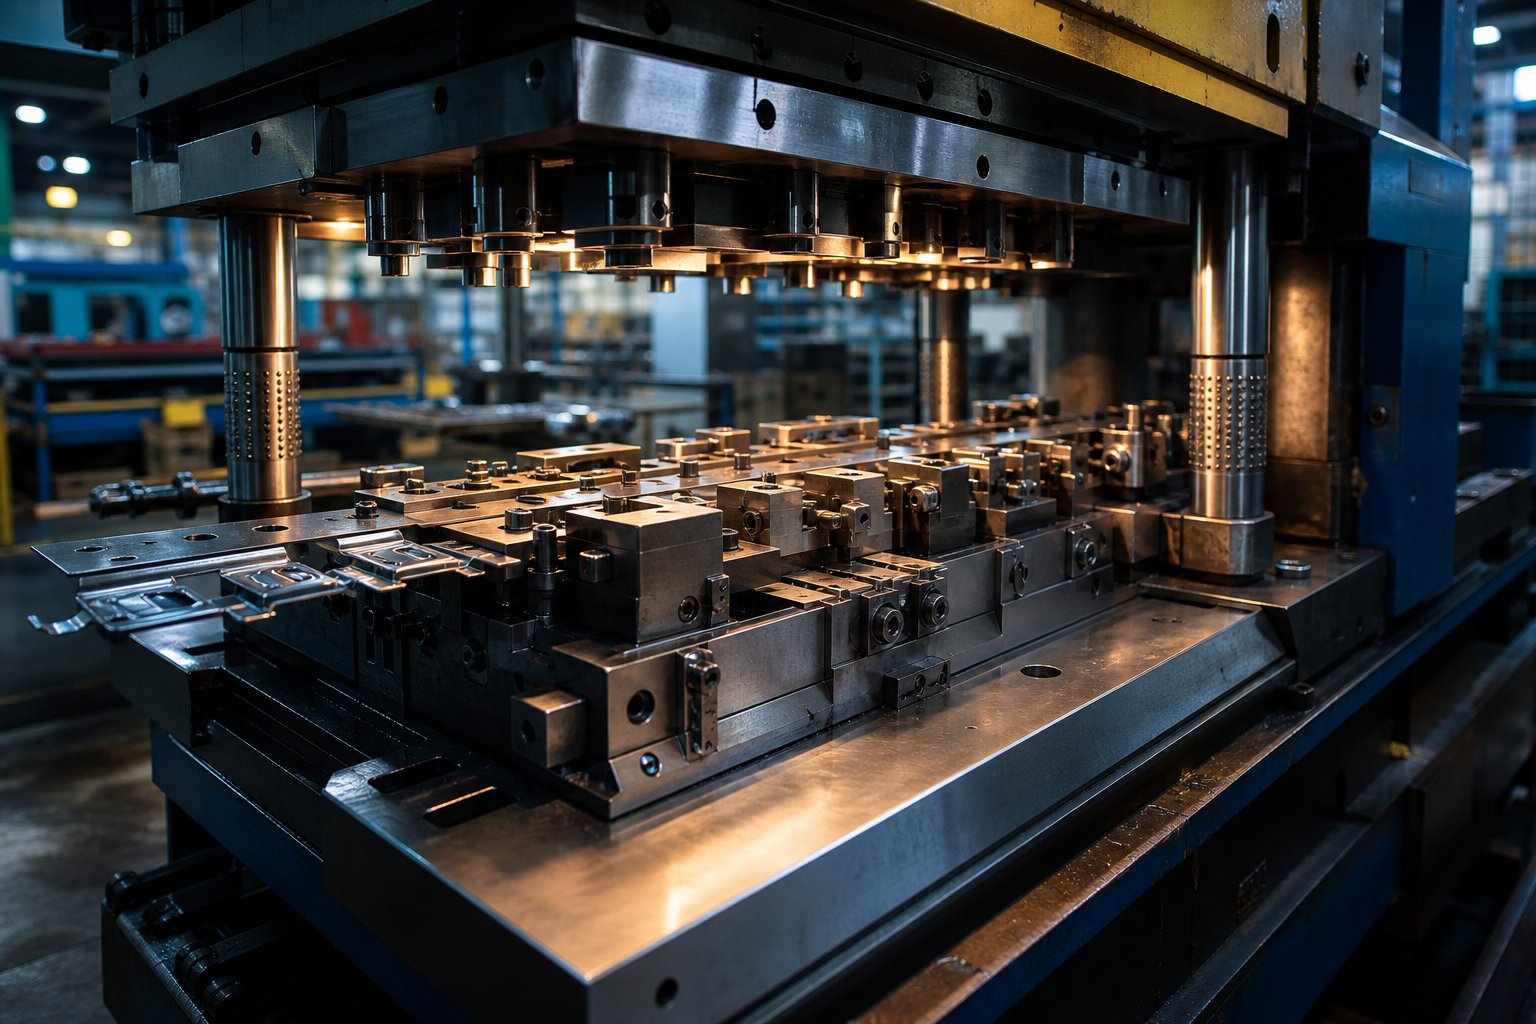
Progressive dies are the workhorses for small-to-medium parts produced at high volume. A metal strip feeds through multiple stations inside a single stamping die set, with each station performing a different operation - cutting, bending, coining, or forming - until a finished part drops out at the end. Industry data from manufacturers places the average progressive die around $30,000, though simpler geometries can dip to $15,000 and complex multi-station tools exceed $60,000.
Why the wide spread? Every station added to the strip layout means more engineering time, additional CNC machining, tighter alignment tolerances between stations, and more material for the die block itself. A 5-station stamp die for flat brackets is a different animal than a 15-station tool with in-die tapping and coining. The machining hours alone can double or triple, which is the main reason progressive dies cost significantly more than a single-hit blanking tool performing one operation.
Transfer and Compound Die Cost Ranges
Transfer dies handle parts too large or too geometrically complex for progressive strip feeding. Instead of traveling through the die on a carrier strip, individual blanks are picked up and moved between independent stations by mechanical grippers. This eliminates the connecting web between parts, saving material per piece, but the tooling itself involves multiple die sets, transfer mechanisms, and extensive tryout work. A single drawing die for an automotive fender can run $250,000 to $500,000, and a complete line of draw, trim, flange, and pierce dies for one panel often exceeds $500,000.
Compound dies sit at the other end of the spectrum. They perform multiple cutting operations in a single press stroke, which makes them efficient for flat parts requiring high precision in one plane. Because the metal die set is simpler - no progressive stations, no transfer systems - design and machining costs stay moderate, typically $8,000 to $25,000 depending on part size and tolerance requirements.
Single-Station and Specialty Die Pricing
A single-station die performs one operation per stroke: a blank, a pierce, or a simple bend. These are the least expensive production tools in metal stamping, and they suit low-to-medium volumes where cycle time per part is less critical than tooling budget. Think of prototype brackets, shims, or simple clips where a $3,000 to $15,000 investment makes sense against expected part quantities.
Hot stamping dies occupy a specialty niche, primarily in automotive safety structures like B-pillars and door intrusion beams. They form sheet metal at temperatures above 900 degrees Celsius, then quench the part inside the die to achieve ultra-high tensile strength. The die must withstand extreme thermal cycling, requiring specialized tool steels, integrated cooling channels, and robust construction - all of which push costs into the $80,000 to $300,000 range for a single tool.
The pattern is clear: cost scales with the number of operations performed inside the die, the precision required between those operations, and the environmental demands placed on the tool during production. What is less obvious is how the steel grade chosen for the die itself shifts pricing within each category - a factor that deserves its own close look.
How Die Material Selection Affects Your Budget
Two progressive dies with identical station counts and part geometries can carry very different price tags based on what they are made from. The tool steel grade selected for punches, die blocks, and wear components accounts for a meaningful portion of total stamping die price, and it directly determines how long the tool lasts before it needs sharpening or replacement. Choosing the wrong grade means either overspending upfront on material you do not need, or underspending and paying more in maintenance and downtime later.
Think of it this way: the steel is not just a raw material cost line item. It influences machining time, heat treatment complexity, grinding difficulty, and ultimately the number of parts you can produce before the first regrind. Every one of those downstream effects feeds back into cost.
Common Tool Steel Grades and Their Cost Implications
Most steel stamping dies are built from a handful of well-understood tool steel grades, each offering a different balance of hardness, toughness, wear resistance, and machinability. Here is how the most common options compare:
| Steel Grade | Relative Material Cost | Typical Hardness (HRC) | Best-Suited Applications | Expected Die Life Range |
|---|---|---|---|---|
| A2 | Low to Moderate | 57 - 62 | Medium-volume blanking, piercing, forming dies | 200,000 - 500,000 hits |
| D2 | Moderate to High | 58 - 64 | High-volume blanking, stamping abrasive materials | 500,000 - 1,000,000+ hits |
| S7 | Moderate | 54 - 58 | Impact-heavy operations, bending, cold heading dies | 300,000 - 700,000 hits |
| M2 (High-Speed Steel) | Moderate to High | 60 - 65 | High-speed progressive dies, thin-material piercing | 500,000 - 1,000,000 hits |
| Tungsten Carbide | High (3-5x steel) | 70+ HRC (88-92 HRA) | Ultra-high-volume, tight-tolerance, abrasive materials | 2,000,000 - 10,000,000+ hits |
A2 steel is a medium-alloy, air-hardening grade that offers good toughness and easier machining compared to higher-carbon options. For a metal stamping tool used in moderate production volumes, A2 keeps both material cost and machining time manageable. It is often the default recommendation when die life requirements fall below 500,000 cycles.
D2 is the step up. It is a high-carbon, high-chromium steel with excellent wear resistance, making it a popular choice for stamping die steel in high-volume applications. The trade-off? D2 is harder to machine, more difficult to EDM, and requires careful heat treatment to avoid cracking. Those extra processing steps raise the finished die cost, but the extended service life often justifies the premium when you are producing hundreds of thousands of parts.
S7 occupies a unique position. It is prized for its exceptional shock resistance and toughness, making it the go-to grade for operations involving heavy impact, such as deep bending, coining, or forming thick stock. Where D2 might chip under repeated high-impact loads, S7 absorbs the shock. Its hardness is lower, so it wears faster in abrasive conditions, but in impact-dominated applications, it outlasts harder, more brittle grades.
The pattern is consistent across all steel stamping tools: harder grades cost more in raw material and demand more machining hours, but they deliver longer die life. Softer grades are cheaper and faster to produce but wear sooner. Your production volume and workpiece material should guide the decision, not just the initial price tag.
When Carbide Inserts Justify the Premium
Tungsten carbide is in a different league entirely. With wear resistance up to 30 times greater than tool steel, a carbide insert maintains tight dimensional tolerances across millions of cycles where even D2 would require multiple regrinds. The initial cost for a carbide die component can be three to five times higher than its steel equivalent, but the math changes dramatically at high volumes.
Imagine a piercing punch in a progressive die that produces 3 million parts per year. A D2 punch might need regrinding every 400,000 hits, meaning seven or eight service interruptions annually. A carbide punch running the same application might last 3 million hits before its first maintenance event. Fewer stops, fewer spare components, and more consistent part quality over the entire run.
Most die builders do not construct entire dies from carbide. The material is brittle, difficult to modify, and requires specialized diamond grinding or EDM for any rework. Instead, the industry standard is a hybrid approach: carbide inserts at critical high-wear points, such as piercing punches and cutting edges, seated within a tougher tool steel die body. This keeps overall stamping die steel costs manageable while placing premium material precisely where it delivers the most value.
Carbide makes economic sense when you are running high-volume production with abrasive workpiece materials, when tolerance drift between sharpening intervals is unacceptable, or when the cost of press downtime for die maintenance exceeds the upfront premium for longer-lasting components.
Surface Treatments That Extend Die Life and Add Cost
Beyond base material selection, surface coatings offer another lever for improving die performance. Titanium Nitride (TiN) and Titanium Carbo-Nitride (TiCN) are the most common PVD coatings applied to stamping die components. They add a microscopically thin layer, typically 2 to 5 micrometers, that significantly increases surface hardness and reduces friction between the die and the workpiece.
The numbers are compelling. TiN-coated forming dies have demonstrated lifespan improvements from 100,000 cycles to over 600,000 cycles in metal stamping applications. TiCN goes further in some scenarios, offering better performance when stamping aluminum or other materials prone to galling, thanks to its lower friction coefficient.
Coating costs vary depending on part size and batch quantity, but they typically represent a small fraction of total die cost while delivering a multiple of additional service life. The catch is that coatings must be reapplied after each regrinding cycle, since sharpening removes the treated surface layer. This adds a recurring cost, but for dies stamping abrasive materials like stainless steel or high-strength alloys, the investment in coated steel stamping dies pays for itself within the first production run.
The right combination of base steel grade, selective carbide inserts, and surface coatings creates a die optimized for both upfront cost and long-term economics. But material selection does not happen in a vacuum. The workpiece material being stamped places its own demands on the die, influencing which grades and treatments are necessary to achieve acceptable tool life.
How the Part Material Being Stamped Drives Die Cost
The die does not exist in isolation. It exists in relationship to the sheet metal it stamps. A die built to blank mild steel all day will fail within weeks if you switch to stainless steel without upgrading the tooling. The workpiece material dictates punch-to-die clearance, required press tonnage, tool steel selection, and the overall structural robustness of the die. Each of these parameters feeds directly into cost.
Here is how common workpiece materials rank by their relative impact on die cost, from lowest to highest:
- Mild steel (SPCC, DC01, 1008/1010): Low impact. Soft, predictable, easy to form. Allows standard tool steels and wider clearances.
- Aluminum (5052, 6061): Low to moderate impact. Low forming force, but prone to galling and buildup on die surfaces, requiring polished tooling or coatings.
- Copper and brass: Moderate impact. Soft but sticky. Die surfaces need special finishes to prevent adhesion and material transfer.
- Stainless steel (304, 316): High impact. Work-hardens rapidly, demanding premium tool steels like D2 or carbide inserts, tighter clearances, and higher press tonnage.
- Advanced high-strength steel (AHSS, DP590, DP980): Very high impact. Extreme forming forces, aggressive wear on die surfaces, and springback behavior requiring simulation-driven engineering.
Stamping Mild Steel vs. High-Strength Steel
Mild steel is the friendliest material for sheet metal stamping dies. It shears cleanly, forms predictably, and places relatively low stress on tooling. A sheet metal punch and die set built for mild steel can use mid-grade tool steels, standard clearances of around 5 to 10 percent of material thickness per side, and straightforward die geometry. This keeps engineering time and machining costs in check.
High-strength steels change the equation entirely. When you are producing metal stamping car parts from dual-phase or martensitic steels, forming forces can be two to three times higher than mild steel of the same thickness. That force increase demands heavier die shoes, thicker backing plates, and more robust guide systems to prevent deflection under load. The die components themselves must be made from harder steels or carbide to resist the abrasive wear that AHSS creates on cutting edges.
Auto metal stamping for structural components like B-pillars and door reinforcements often involves hot-stamped boron steel (22MnB5) or cold-stamped DP980. In these applications, toolmakers typically specify D2 or carbide cutting sections, add nitrogen gas springs for controlled forming pressure, and integrate simulation-validated springback compensation into the die profiles. Each of those requirements adds engineering hours and material cost to the final tooling investment.
Aluminum and Non-Ferrous Materials as Cost Variables
Aluminum seems like it should be easy on tooling. It is soft, requires low forming force, and does not work-harden as aggressively as stainless steel. The reality is more nuanced. Aluminum's tendency to gall, or weld itself microscopically to die surfaces, forces toolmakers to polish forming areas to mirror finishes, apply TiCN or DLC coatings, or use specialized die materials that resist adhesion.
These surface preparation steps add cost that does not exist when stamping mild steel. Copper and brass behave similarly, creating material buildup on punch faces that degrades part quality if the die is not designed to manage it. For sheet metal stamping dies working with non-ferrous materials, the cost driver is not brute force but surface engineering and maintenance frequency.
Beyond material hardness, tolerance and surface finish requirements act as independent cost multipliers. Tighter dimensional tolerances, regardless of workpiece material, require precision grinding, wire EDM, and extended inspection time during die construction. A part with critical features held to plus or minus 0.05 mm demands die components built to even tighter standards. Similarly, if the stamped part needs a specific surface finish for cosmetic or functional reasons, the forming surfaces of the die must be polished or textured accordingly, adding labor hours that compound across every forming station in the tool.
The relationship between workpiece material and stamping die price is not always linear, but it is always present. A die quoting $25,000 for mild steel might jump to $40,000 or more for the same part geometry in stainless, simply because every component in the tool must be upgraded to survive the harder material. Communicating your material specification clearly and early is one of the simplest ways to ensure your quotes reflect reality rather than assumptions, and it directly connects to how production volume shapes the broader investment strategy for any tooling program.
Production Volume and Cost-Per-Part Economics
Here is a scenario that plays out in tooling procurement meetings every week: a buyer sees two quotes for the same part. One metal punch and die set comes in at $18,000. The other is $45,000. The instinct is obvious - go with the cheaper option and move on. But that instinct ignores the single most powerful variable in stamping economics: how many parts you plan to run.
A stamping die is not a consumable. It is a capital investment whose cost gets distributed across every part it produces. The moment you divide that purchase price by total expected output, you stop comparing die prices and start comparing cost-per-part - which is the number that actually hits your profit margin.
Amortizing Die Cost Across Production Runs
The math is straightforward but the implications are significant. When you spread tooling cost over production volume, even expensive dies become remarkably economical at scale. Consider a progressive die priced at $25,000 and used to produce metal punches and dies for an electrical connector program. At 10,000 parts, the tooling adds $2.50 to each piece. At 100,000 parts, it drops to $0.25. At 1,000,000 parts, tooling contributes just $0.025 per piece - essentially vanishing into the overall part cost.
Data from Talan Products illustrates this clearly: a $25,000 progressive die producing parts at 4,000 pieces per hour delivers a per-piece cost of $25.06 at 1,000 parts but drops to $1.06 at 25,000 parts. Once the tooling is paid off, subsequent production runs cost roughly $0.056 per piece - a 99% reduction from the first-run price. The die itself lasts for millions of cycles, meaning every part produced after amortization is nearly pure margin.
This amortization curve is why volume assumptions fundamentally change the tooling investment strategy. A die that seems expensive at first glance may be the most economical choice when viewed across a multi-year production program. The key question is never "what does the die cost?" It is "what does the die cost per part over the life of my program?"
When a More Expensive Die Actually Saves Money
Imagine two options for a metal die punch application producing automotive brackets:
- Option A: A $20,000 die built with A2 tool steel, rated for 200,000 hits before requiring major refurbishment or replacement.
- Option B: A $45,000 die built with D2 steel and carbide inserts at critical wear points, rated for 1,000,000 hits with only periodic regrinding.
If your program calls for 800,000 parts over four years, Option A needs four die builds or three major refurbishments to complete the job. Even at a conservative $12,000 per refurbishment, the total tooling spend reaches $56,000 or more - not counting the production downtime, logistics, and quality revalidation each service event requires. Option B runs the entire program on a single tool with scheduled maintenance, delivering lower total cost and far less disruption.
The pattern holds consistently across stamping die components and full die assemblies. Industry analysis confirms that purchasing a lower-class die for a high-volume program is "akin to a doomed gamble - resulting in endless downtime for repairs and catastrophic quality failures." The cheapest die on paper becomes the most expensive die in practice when it cannot survive the intended production volume.
The cheapest die is not always the most economical. Total cost of ownership depends on expected production volume, and a higher upfront investment often delivers the lowest cost-per-part over the life of a program.
This principle applies equally whether you are sourcing a simple single-station blanking tool or a complex progressive die with dozens of metal punches and dies working in sequence. The die's rated lifespan must match or exceed your volume projection, or you will pay the difference in maintenance, replacement, and lost production time.
Communicating Volume Projections to Your Toolmaker
Toolmakers design dies to a specific lifespan tier. If you tell them you need 50,000 parts, they will engineer accordingly - lighter construction, standard steels, minimal wear features. If the program later scales to 500,000 parts, that die was never built to handle it. You end up either replacing it entirely or accepting escalating maintenance costs and declining part quality.
To get the right die engineered for your actual needs, communicate these specifics in your tooling request:
- Annual volume: How many parts per year at steady state.
- Life-of-program volume: Total expected output across all production years.
- Ramp-up profile: Whether volumes start low and increase, affecting when peak wear conditions begin.
- Batch size and frequency: Running 10,000 parts once a month differs from running 500 parts daily in terms of thermal cycling and maintenance scheduling.
Professional die suppliers use these inputs to select the appropriate SPI mold class equivalent, choose steel grades that deliver adequate life without over-engineering, and design stamping die components for accessibility during the maintenance events your volume will inevitably require. A die built for 100,000 hits uses different materials, clearances, and construction techniques than one built for 2,000,000 hits - and its price reflects that difference for good reason.
Volume projections also influence whether a single-cavity approach or a multi-out die makes economic sense. Running two parts per stroke from a slightly more expensive tool effectively halves your per-piece amortization and doubles throughput without doubling cost. The general rule is that a multi-cavity die costs roughly 2.5 times a single-cavity equivalent while producing double or quadruple the output per cycle - a compelling ROI when volumes justify it.
The bottom line: stamping die price is meaningless without volume context. A $50,000 die producing 2 million parts at $0.025 per piece in tooling cost is objectively cheaper than a $15,000 die that needs replacing twice to reach the same output. Buyers who lead with volume data give toolmakers the information needed to optimize the investment, and they avoid the expensive lesson of discovering their "budget" die was never designed for the job it was asked to do.
Volume shapes the investment. But the same die, quoted to the same volume spec, can carry a dramatically different price tag depending on where in the world it gets built - a geographic variable that adds another layer to the cost equation.
Why Stamping Die Prices Vary by Region
You request quotes from four suppliers in four countries for the same progressive die. The numbers come back: $22,000 from China, $28,000 from Southeast Asia, $48,000 from the US, and $55,000 from Germany. All claim to meet your specifications. So what explains the gap - and more importantly, what are you actually getting at each price point?
Geographic location is not just a line item. It influences labor rates, machining overhead, material sourcing, communication dynamics, and the total timeline from order to first article approval. Buyers searching for metal stamping dies for sale globally need to evaluate these quotes with full context, not just bottom-line numbers.
Regional Pricing Differences Explained
The primary cost driver behind regional variation is labor. Press labor in China runs approximately $5 to $8 per hour, compared to $18 to $25 per hour in the United States and roughly 15 to 25 euros per hour in Europe. Since die construction is machining-intensive - requiring hundreds of CNC, EDM, and grinding hours - that labor differential compounds across the entire build cycle. A complex progressive die requiring 600 machining hours carries a very different labor burden at $6 per hour versus $22 per hour.
Beyond labor, overhead costs like facility expenses, environmental compliance, insurance, and regulatory certifications vary substantially. Western manufacturers carry higher baseline costs for all of these, which gets baked into every quote. Certified facilities in Asia holding ISO 9001 or IATF 16949 charge 20 to 40 percent more than non-certified shops to cover their audit and documentation systems - but they still come in well below equivalent Western pricing.
| Region | Relative Cost Tier | Typical Lead Time | Communication Considerations | Logistics Factors |
|---|---|---|---|---|
| China | Low (30-50% below US) | 6 - 12 weeks | Time zone gap of 12-13 hours; language barriers on technical details; 2-3 revision cycles common | Ocean freight 4-6 weeks; import duties 15-25%; crating and shipping weight costs |
| Southeast Asia (Vietnam, Thailand) | Low to Moderate (20-40% below US) | 8 - 14 weeks | Similar time zone challenges as China; growing English proficiency; smaller supplier pool for complex tooling | Similar shipping timelines to China; fewer established freight routes for tooling |
| United States | High (baseline) | 8 - 16 weeks | Same time zone or close; direct engineering collaboration; real-time issue resolution | Domestic ground freight 1-5 days; no duties; easy tool retrieval for maintenance |
| Europe (Germany, Portugal, Italy) | High to Very High (0-20% above US) | 10 - 16 weeks | Moderate time zone gap; strong engineering culture; documentation-heavy process | Air or ocean freight 2-5 weeks to North America; VAT considerations |
Offshore vs. Domestic Tooling Trade-Offs
The sticker price from an offshore supplier can look compelling. But several factors quietly narrow that gap once you account for the full procurement cycle.
Shipping and duties. A progressive die weighing 800 kg shipped from China to the Midwest United States adds ocean freight, port handling, inland trucking, and crating costs. As of 2026, average effective tariff rates on key industrial inputs have climbed to 15 to 25 percent, meaning a $25,000 die can carry $3,750 to $6,250 in duties alone before it clears customs. Add $2,000 to $4,000 in freight, and your landed cost already narrows the original savings considerably.
Communication overhead and revision cycles. Technical die design requires precise feedback loops. When your engineering team works a 12-hour time offset from the toolmaker, every question takes a day to resolve instead of an hour. Vague RFQ language that a domestic shop would clarify in a phone call can lead to misinterpretation overseas, resulting in design revisions that add weeks. Simple issues can take days to resolve due to asynchronous communication, and tolerance misunderstandings may not surface until trial samples arrive - far too late for a quick fix.
Quality verification. With a domestic die metal stamping supplier, you can visit the shop floor, witness tryout runs, and approve samples in person. Offshore tooling often requires either third-party inspection services, engineer travel, or reliance on supplier-provided reports. Each option adds cost or risk. Higher-end Chinese facilities serving automotive OEMs deliver quality on par with Western shops, but verifying that capability before committing requires due diligence that itself consumes time and budget.
Ongoing support and maintenance proximity. Dies need maintenance throughout their service life. When your metal die stamps are built overseas and your production press sits in Ohio, every maintenance event means either shipping the die internationally or finding a local tool shop willing to work on someone else's design. Domestic toolmakers typically offer ongoing support, emergency repairs, and spare component manufacturing with days of turnaround rather than weeks. That proximity advantage becomes critical when an unplanned die failure threatens to shut down a production line.
Does offshore sourcing still make sense? Absolutely - in the right circumstances. When your part design is finalized, your volume is high, your timeline is flexible, and you have robust quality verification processes in place, the 15 to 30 percent net savings on tooling can be meaningful. Companies producing mature, stable designs with predictable demand and flexible lead times are the best candidates for offshore die procurement.
The wrong scenario for offshore tooling? Early-stage programs with evolving designs, tight launch deadlines, or parts requiring iterative tryout collaboration. In those cases, the ability to walk into your toolmaker's shop, review tryout samples, and approve changes in real time delivers value that no amount of cost savings can replace.
Wherever you source, the initial purchase price is only the beginning. The true financial picture includes every dollar spent keeping that die running across its full production life - a total cost of ownership that many buyers underestimate until the invoices start arriving.
Total Cost of Ownership Beyond the Purchase Price
A stamping die price on a purchase order tells you what the tool costs to build. It does not tell you what the tool costs to own. The difference can be substantial. Maintenance, sharpening, component replacement, unplanned downtime, and eventual refurbishment or retirement add up to a second price tag that many buyers never budget for - until it arrives as a series of unplanned invoices over months and years of production.
Industry experience consistently shows that a stamper's largest ongoing cost, after raw material, is the labor required to service and maintain the die. Ignoring this reality during procurement means your initial budget captures only a fraction of true tooling spend. The real question is not "what does this die cost?" but "what will this die cost me over its entire working life?"
Maintenance and Regrinding Cost Expectations
Every stamping die, regardless of how well it is built, wears. Metal punches and die components lose their edge geometry through repeated contact with sheet metal. Cutting clearances open up. Forming surfaces develop micro-scratches that transfer to parts. These are not failures - they are the predictable consequences of doing exactly what the tool was designed to do, millions of times.
The key is anticipating when each maintenance activity becomes necessary. Here are the most common service events and the triggers that signal they are due:
- Punch sharpening/regrinding: Triggered by burr height exceeding specification (typically 10% of material thickness), visible edge rounding, or hit count thresholds set during initial tryout - commonly every 50,000 to 150,000 hits depending on material hardness and tool steel grade.
- Die button resharpening: Same triggers as punch sharpening. Usually serviced at the same interval to maintain proper punch-to-die clearance relationships.
- Spring and nitrogen cylinder replacement: Triggered by loss of stripping force, inconsistent part ejection, or measured pressure drop. Typical interval is 500,000 to 1,000,000 cycles for quality nitrogen springs.
- Pilot and guide pin replacement: Triggered by feed misregistration, progressive strip wandering, or measured diameter wear exceeding 0.01 mm. Usually checked at every major service event.
- Surface coating reapplication: Required after every regrinding cycle, since sharpening removes the TiN or TiCN layer. Adds $200 to $800 per batch of components depending on quantity and coating type.
- Inspection and measurement: Triggered by dimensional drift in stamped parts, visible wear indicators on tooling, or calendar-based quality audits - typically quarterly for high-volume dies.
Each regrinding event costs between $500 and $3,000 depending on the number of stamping die punches involved, their size, and whether the work stays in-house or goes to an outside grinding service. A progressive die with 15 to 20 active cutting stations that gets resharpened every 80,000 hits will accumulate significant maintenance spend over a million-part program. If you run 250,000 parts per year, you are looking at three or more service events annually - each pulling the die from production and consuming toolroom labor.
The hidden multiplier? Unplanned maintenance costs roughly four times more than planned maintenance. When a die punches for metal break mid-run, you absorb not just the repair itself but also unscheduled press downtime, operator idle time, setup labor to pull and reset the tool, quality lab time to revalidate parts, scrap costs, and management overhead. A single broken punch costing $25 to replace can generate over $500 in total disruption cost once you account for the full operational impact.
Die Life Expectancy and Replacement Planning
Every die has a finite service life. The question is whether you reach that endpoint gradually through planned obsolescence or suddenly through catastrophic failure. Planned replacement follows a predictable economic curve: as the die ages, maintenance frequency increases, part quality becomes harder to hold, and each service event delivers diminishing returns. At some point, the cost of the next refurbishment exceeds the value it creates.
When does refurbishment make economic sense versus commissioning a new die? Consider these decision factors:
- Refurbishment is viable when damage is localized (worn punches, damaged inserts), the die body and shoe remain dimensionally stable, and the die has not exceeded roughly half its design life. Minor surface wear, replaceable component degradation, and normal cutting-edge recession all respond well to refurbishment.
- Replacement becomes necessary when the die shoe shows measurable deflection or cracking, when critical datums have shifted beyond recoverable tolerances, when repeated repairs fail to restore part quality, or when the cost of refurbishment approaches 50 to 60 percent of a new die's price.
A useful rule: if you find yourself replacing the same components more than twice in a short interval, the root cause likely runs deeper than wear. It may indicate undersized components, improper steel selection for the application, or a design that was never built to survive your actual production demands. Continuing to repair in that scenario throws money at symptoms rather than solving the underlying problem.
The decision also ties back to remaining program volume. If your production run has 200,000 parts left and a refurbishment costing $8,000 will carry the die to completion, that is a clear win. If you have 2,000,000 parts remaining and the die is already showing systemic fatigue, investing $8,000 in a band-aid that delays the inevitable for six months makes less sense than commissioning a replacement engineered for the full remaining volume.
How Initial Design Decisions Shape Long-Term Maintenance Costs
Here is what most buyers miss: the maintenance cost profile of a die is largely determined during initial engineering, not during production. Decisions made at the design stage - before a single block of steel gets machined - dictate how easy, fast, and expensive every future service event will be.
Consider the difference between a die built with modular inserts versus solid construction. A modular die uses replaceable insert blocks for cutting and forming stations. When a metal punch stamp wears out or a cutting edge needs service, the technician removes and replaces a single insert without disturbing the rest of the tool. Solid construction integrates cutting geometry directly into the die block, meaning any service requires removing the entire assembly and grinding or re-machining in place. The modular approach costs more upfront - perhaps 10 to 20 percent - but slashes maintenance time and cost for the life of the tool.
Other design decisions with long-term cost implications include:
- Accessibility for sharpening: Punches designed with adequate backup length allow multiple regrinds before replacement. A punch with 3 mm of regrind allowance can be sharpened 20 or more times at 0.1 mm per event, extending its useful life dramatically.
- Standardized component sizing: Using catalog-standard punch and die button dimensions means replacements are available off the shelf, avoiding custom machining lead times and costs.
- Quick-change features: Ball-lock retainers, keyed inserts, and accessible fastener locations reduce die service time from hours to minutes, keeping the press productive.
- Documented shim stacks and timing: Clear records of strip progression, shut heights, and timing allow service technicians to restore the die to proven settings without trial-and-error, reducing post-maintenance scrap.
A well-designed die might cost 15 percent more at purchase but save 40 percent or more in lifetime maintenance spend. When you evaluate stamping die price, ask your supplier specifically what maintenance provisions are built into the design. Request documentation of regrind allowances, spare component lists, and recommended service intervals. Suppliers who provide this information upfront are engineering for total cost of ownership, not just a competitive initial quote.
The operational truth is straightforward: every dollar you budget for maintenance extends the productive life of your tooling investment and protects part quality. Every dollar you fail to budget becomes an unplanned expense that arrives at the worst possible time. The smarter path is knowing what to expect before the die ever hits the press - and that starts with how you structure your initial request for quotation.
Preparing an RFQ That Gets Accurate Die Pricing
The quality of your quote depends entirely on the quality of your request. Send a vague RFQ with a rough sketch and a sentence about quantities, and you will receive a padded number full of contingency. Send a complete, well-structured package, and you give the toolmaker everything needed to price the job with precision rather than guesswork. The difference between those two outcomes is often 20 to 30 percent on the final number - not because the die changed, but because the supplier's risk perception changed.
Every undefined variable in a custom stamping dies request forces the quoting engineer to make assumptions. Each assumption carries risk, and risk gets priced in. Unspecified material? The estimator assumes something harder. No surface finish callout? They quote for a tighter finish than you might need. Missing volume data? They hedge toward a shorter die life and quote accordingly. The result is a stamping die price inflated by uncertainty, not by actual complexity.
What Information You Need Before Requesting a Quote
A professional RFQ package eliminates ambiguity and gives every supplier the same baseline to quote against. Here are the essential elements, in the order a metal stamping tool and die shop needs them to build an accurate estimate:
- Part drawings with full GD&T: Provide a complete 2D drawing with all dimensions, tolerances, geometric callouts, and section views. Supplement with a 3D CAD model in STEP or IGES format. Confirm that 2D and 3D files are aligned and include revision dates so there is no confusion about which geometry is current.
- Material specification: State the exact grade and applicable standard (ASTM, JIS, DIN). Include thickness and tolerance band. If substitutes are acceptable, note them explicitly - this lets suppliers propose cost-effective alternatives without guessing.
- Annual volume and life-of-program volume: These two numbers drive every major engineering decision. Annual volume determines production rate and press utilization. Life-of-program volume determines which tool steel grade and die class the toolmaker selects. Without both, you are asking someone to build a tool without telling them how long it needs to last.
- Surface finish requirements: Specify any cosmetic standards, Ra values, or texture requirements on the stamped part. Mark which surfaces are cosmetic versus non-visible on the drawing. Allowing non-critical surfaces to remain as-stamped can reduce die polishing costs significantly.
- Secondary operations: List all post-stamping processes - heat treatment, plating, welding, tapping, deburring - in sequence. These affect how the die is designed, particularly around burr direction, blank orientation, and datum features needed for downstream fixturing.
- Critical tolerances and inspection requirements: Identify which dimensions are critical-to-function versus general. Specify if PPAP, FAI, or specific measurement methods are required. This tells the toolmaker where to invest precision and where standard practices suffice.
- Timeline and delivery constraints: State whether your date is firm or flexible. A custom die press tool on a 6-week rush timeline costs more than the same die on a standard 12-week build schedule, because overtime and prioritization add direct labor cost.
- Budget transparency (optional but recommended): Sharing a target budget range invites the supplier to propose design, material, or process alternatives that meet functional needs at your price point. This collaborative approach often surfaces cost reduction opportunities that neither side would find independently.
Industry best practices from procurement specialists confirm that a structured RFQ benefits both sides: buyers receive comparable quotes more quickly, while suppliers allocate resources efficiently and offer more competitive pricing. The inverse is equally true - disorganized or incomplete documentation delays timelines and inflates estimates because suppliers must sort through ambiguity before they can even begin quoting.
One detail that catches many buyers: always include a one-page summary sheet listing all submitted files, revision levels, and key project parameters. This single document serves as a checklist that prevents critical information from getting buried in a zip file of drawings and specifications.
How to Compare Die Quotes on Equal Terms
You have sent a thorough RFQ to three or four qualified suppliers. The quotes arrive, and the numbers differ. Before choosing based on price alone, you need to verify you are comparing equivalent scopes - not just bottom lines.
The most common reason quotes diverge is differing technical assumptions. One supplier quotes a Class A die with carbide inserts rated for 1,000,000 hits. Another quotes a Class B tool in D2 steel rated for 300,000 hits. Both legitimately respond to your RFQ, but they are offering fundamentally different products. Unless you request a standardized breakdown, that difference hides behind a single dollar figure.
When evaluating metal punch stamps and die quotations, request that each supplier itemize:
- Die classification and expected hit life
- Tool steel grades specified for major components
- Number of stations (for progressive dies) or operations
- Design and engineering hours included
- Tryout runs included and sample quantities provided
- Surface treatments or coatings applied
- Spare components included in the initial price
- Payment terms and progress payment structure
This itemization reveals cost drivers quickly. A supplier quoting $35,000 with two tryout iterations, 50 sample parts, and a full spare punch set included delivers more value than a $30,000 quote that covers only basic construction with no tryout allocation. The core principle behind informed quote comparison is to dig into the assumptions, ask the right questions, and ensure your comparisons reflect true technical parity rather than just sticker price.
Pay particular attention to what each supplier includes in their development process. A qualified die supplier does not just machine steel and ship it. They move through a defined sequence: feasibility assessment, process simulation, detailed design, machining, assembly, tryout, dimensional validation, and correction loops until the die produces conforming parts. Suppliers like YICHEN, for example, structure their process from initial feasibility review and CAE simulation through precision machining, trial runs, and final inspection - giving buyers visibility into each stage and what it contributes to the quoted price. When a supplier includes these steps explicitly in their quote breakdown, you can see where your money goes and evaluate whether each phase is adequately funded.
Suppliers who skip simulation, compress tryout, or omit inspection from their quoted scope are not necessarily cheaper. They are deferring cost to later stages where changes become more expensive. A die that arrives without adequate tryout often needs on-site corrections at your facility, consuming your press time and toolroom labor - costs that never appeared on the original quote but land squarely on your budget.
The practical takeaway: treat the quoting process as an engineering conversation, not a purchasing transaction. The suppliers who ask the most questions about your RFQ are usually the ones who deliver the most accurate pricing - because they are eliminating assumptions rather than padding them. Accuracy at the quoting stage saves money at every stage that follows, and it sets the foundation for the cost optimization strategies that can further reduce your tooling investment without compromising quality.
Strategies to Optimize Stamping Die Cost Without Sacrificing Quality
Getting an accurate quote is half the battle. The other half is making sure the part you are quoting is designed to be stamped efficiently in the first place. The single most effective lever for reducing stamping die price is not negotiating harder or switching to a cheaper supplier - it is redesigning the part so the die becomes simpler to build. Every feature eliminated, every tolerance relaxed where it does not matter, and every geometry simplified translates directly into fewer machining hours, less complex strip layouts, and lower tooling cost.
This is not about cutting corners. It is about engineering intelligence applied before the die is ever quoted.
Design Changes That Reduce Die Complexity and Cost
Design for Manufacturability, or DFM, is the practice of shaping a part so it can be produced economically without sacrificing function. In stamping, DFM decisions directly determine how many stations a progressive die needs, what steel grade the toolmaker selects, and how much tryout iteration the tool requires before it produces conforming parts. Small geometry changes at the design stage can eliminate entire die stations or remove the need for secondary operations downstream.
Here are the DFM principles that deliver the most measurable impact on a custom metal stamping die quote:
- Simplify part geometry: Eliminate decorative features, complex contours, or sharp internal corners that require EDM or specialized machining. Every feature the die must form adds tooling cost. A shape that looks elegant in CAD may add $5,000 or more in die construction if it demands an extra forming station.
- Relax non-critical tolerances: Tight tolerances on every dimension force the toolmaker to precision-grind surfaces that could otherwise be left as-machined. Identify which features are critical-to-function and hold only those to tight specifications. A blanked hole that serves as a wire pass-through does not need the same tolerance as a bearing bore.
- Standardize hole sizes and punch geometry: Using catalog-standard punch dimensions rather than custom sizes means cheaper tooling components, faster replacement, and lower maintenance costs over the die's life. A 6.35 mm round hole uses a stock punch. A 6.27 mm hole requires a custom-ground tool.
- Avoid unnecessary small features: Tiny slots, narrow bridges, and closely spaced holes create fragile punch geometries that break frequently and demand premium tool steels. Moving features apart by even 1 mm can allow standard construction rather than specialized reinforcement.
- Design for common strip widths: A sheet metal stamp part whose blank fits neatly into a standard coil width reduces material waste and eliminates the cost of custom-slit stock. Ask your supplier what widths are readily available before finalizing blank dimensions.
- Minimize draw depth and sharp bends: Deep draws and acute bend angles require more forming stages, higher press tonnage, and stronger die construction. Shallower forms and generous radii simplify the metal stamp die and reduce both build cost and ongoing wear.
The pattern across all these principles is consistent: complexity costs money to machine into a die. Engaging in DFM early in the design process is one of the most effective ways to control costs because it addresses the root cause of expense rather than negotiating around its symptoms. A part redesigned for stampability can cut 15 to 30 percent from tooling cost without any change in functional performance.
Procurement Strategies for Better Tooling Value
Beyond part design, how you structure the procurement itself affects what you pay and what you get. Smart sourcing decisions compound with DFM savings to drive meaningful reductions in total tooling spend.
Engage your toolmaker during design, not after. The most expensive sentence in stamping procurement is "the design is already frozen." When die engineers review a part early, they spot manufacturability issues that would otherwise require costly workarounds in the tool. Suppliers offering feasibility assessment and CAE simulation at the front end of development - YICHEN is one example, running forming simulations before die construction begins - help manufacturers identify cost-reduction opportunities while changes are still free. Simulation-driven development can
reduce tool tryout iterations by 30 to 50 percent, cutting both lead time and the rework budget that inflates many die programs.
Bundle programs when possible. Quoting multiple dies in a single package gives the toolmaker scheduling flexibility and volume purchasing power on steel and components. Many shops offer 5 to 15 percent discounts on multi-die programs versus individual tool orders because setup, engineering overhead, and project management costs spread across a larger base.
Specify die class to match actual need. Over-specifying a die built for 2,000,000 hits when your program calls for 300,000 parts wastes budget on unnecessary premium materials and construction. Conversely, under-specifying to save money upfront creates replacement costs later. Match the tool to the job - no more, no less.
Consider modular and interchangeable designs. If you produce a family of similar parts, investing in a base die with interchangeable inserts can be more economical than commissioning separate tooling for each variant. The concept parallels how a debossing die maker might use a common frame with swappable detail plates for different designs - the same modularity principle applies at industrial scale, where a single die body houses different punch and cavity sets for part variants sharing common geometry.
Plan spare components at purchase. Ordering critical wear parts - punches, die buttons, forming inserts - alongside the initial die build costs a fraction of ordering them individually later. The toolmaker has the program set up, the steel purchased, and the measurements fresh. Adding a spare set of cutting punches to a $35,000 die order might add $1,500 at the time of build but $4,000 if ordered separately a year later.
The underlying strategy ties every section of this guide together: stamping die price is not a fixed number you discover at the quoting stage. It is a variable you influence through design decisions, material selections, volume planning, supplier relationships, and maintenance foresight. Buyers who treat tooling as an engineering investment rather than a purchasing transaction consistently achieve lower cost-per-part, longer die life, and fewer production disruptions. The cheapest path to a good stamped part is not finding the cheapest die - it is building the right die for the right job, informed by the full picture of what drives cost from first concept through final production hit.
Frequently Asked Questions About Stamping Die Price
1. How much does a stamping die cost on average?
Stamping die prices vary widely based on type and complexity. Simple single-station blanking dies start around $3,000 to $15,000, compound dies range from $8,000 to $25,000, and progressive dies typically fall between $15,000 and $60,000 or more. Large transfer dies for automotive body panels can exceed $500,000 to $1,000,000. The average progressive die costs approximately $30,000, though the final price depends on station count, tool steel grade, part tolerances, and expected production volume.
2. What factors affect the price of a stamping die the most?
Five interconnected factors drive stamping die price: die type and station count, part complexity and tolerances, tool steel grade selected for construction, expected production volume and die life requirements, and the geographic location of the toolmaker. Among these, die type has the largest single impact since it determines the overall scope of engineering, machining, and assembly work. A progressive die with 15 stations costs far more than a single-station blanking tool because each station adds design time, CNC machining hours, and tighter alignment requirements.
3. Is it cheaper to buy stamping dies from China or domestically?
Chinese die suppliers typically quote 30 to 50 percent below US pricing due to lower labor rates ($5-$8/hour versus $18-$25/hour). However, the landed cost gap narrows once you add ocean freight ($2,000-$4,000), import duties (15-25%), communication overhead from time zone differences, and potential revision cycles from misinterpretation. Offshore sourcing works best for finalized designs with high volumes and flexible timelines. For evolving programs requiring iterative collaboration, domestic toolmakers often deliver better total value despite higher sticker prices.
4. How can I reduce stamping die cost without sacrificing part quality?
The most effective approach is Design for Manufacturability (DFM) applied before quoting begins. Simplify part geometry to eliminate unnecessary die stations, relax non-critical tolerances, standardize hole sizes to use catalog punches, and design blanks for common coil widths. Engaging a die supplier like YICHEN early for feasibility assessment and CAE simulation helps identify cost-reduction opportunities while design changes are still free. Additionally, bundling multiple die programs, specifying the correct die class for your volume, and ordering spare wear components with the initial build all reduce total tooling spend.
5. What is the total cost of ownership for a stamping die beyond the purchase price?
The initial purchase price captures only a portion of true tooling cost. Ongoing expenses include punch regrinding every 50,000 to 150,000 hits ($500-$3,000 per event), spring and nitrogen cylinder replacement at 500,000 to 1,000,000 cycles, surface coating reapplication after each sharpening, and eventual major refurbishment or replacement. Unplanned maintenance costs roughly four times more than scheduled service due to press downtime, scrap, and revalidation. Budgeting for total cost of ownership means selecting die designs with modular inserts, adequate regrind allowance, and standardized components that minimize lifetime maintenance spend.


